

How to Change or Import a Custom Minecraft Skin?
To import a custom Minecraft skin in Bedrock Edition, open Dressing Room, select your character, choose Edit Character, open Classic Skins, go to your owned skins, and select Choose New Skin. Then choose the Minecraft skin PNG from your device and select the correct character model.
This guide shows you exactly how to change your Minecraft skin and how to import a custom skin into Minecraft. The main instructions cover Minecraft Bedrock Edition, followed by the steps for Java Edition and fixes for common skin import problems. If you don't have a skin file yet, jump to how to create a custom Minecraft skin first.
What You Need Before Importing a Minecraft Skin
Before opening Minecraft, make sure you have the actual Minecraft skin texture saved on your device. A custom skin is normally a PNG image arranged using Minecraft's player texture layout.
| Skin requirement | What to use |
|---|---|
| File format | PNG |
| Common modern skin size | 64×64 pixels |
| Texture | Minecraft player skin layout |
| Character model | Classic/Wide or Slim |
Do not try to import a screenshot of your character or a normal image. Minecraft needs the actual skin texture file so it can map the head, body, arms, legs, and outer layers onto the 3D character model. If you're unsure what counts, see what actually makes a real Minecraft skin.
How to Create a Custom Minecraft Skin
No skin file yet? You have three quick ways to make one, and each gives you a real, downloadable 64×64 PNG you can import with the steps below:
- Photo to Skin — upload a selfie and AI turns it into a wearable Minecraft skin. See how to turn a photo into a Minecraft skin.
- Text to Skin — describe a character in words and generate a skin from the description. More in how to make a Minecraft skin with AI.
- Minecraft skin editor — draw or edit a skin by hand on a live 3D model, then download the PNG. New to it? Read how to use the skin editor.
You can also convert an existing picture with an image to Minecraft skin tool. Whichever route you pick, finish by downloading the PNG — then continue with the import steps below.
How to Import a Custom Skin in Minecraft Bedrock Edition
If you already have your skin PNG, follow these steps to put the custom skin into Minecraft Bedrock Edition.
1. Download or Save Your Minecraft Skin
First, save the finished skin as a PNG file. If you are using a Minecraft skin editor, use its download or export option rather than taking a screenshot of the 3D preview.
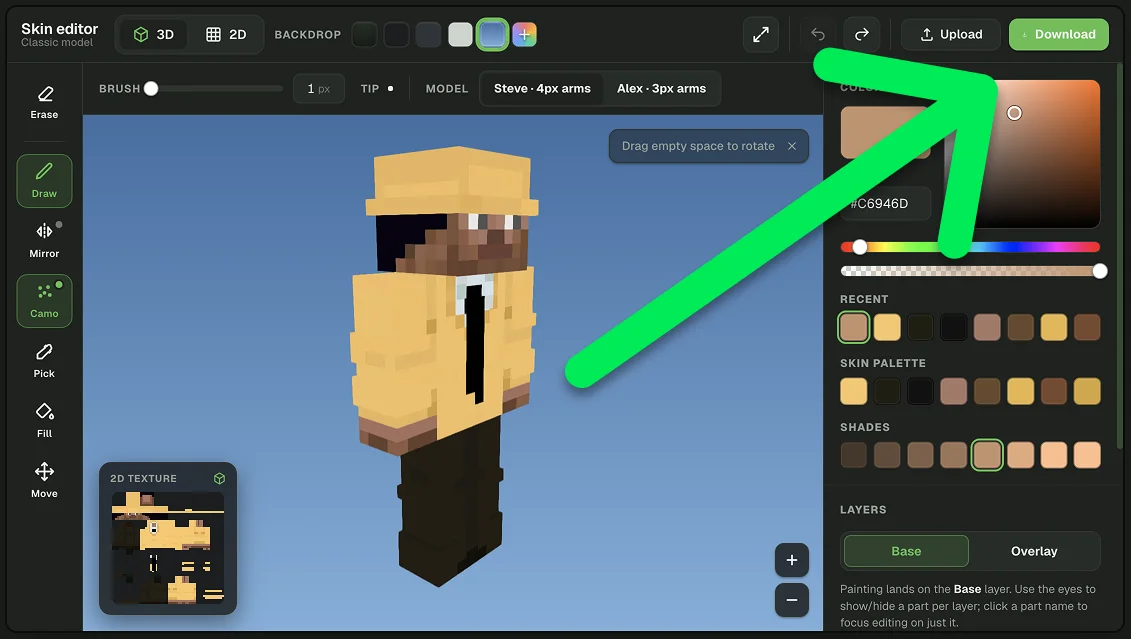
Remember where the file is saved because you will need to select it from Minecraft in the final import step.
2. Open the Minecraft Dressing Room
Launch Minecraft Bedrock Edition and select Dressing Room from the main menu.
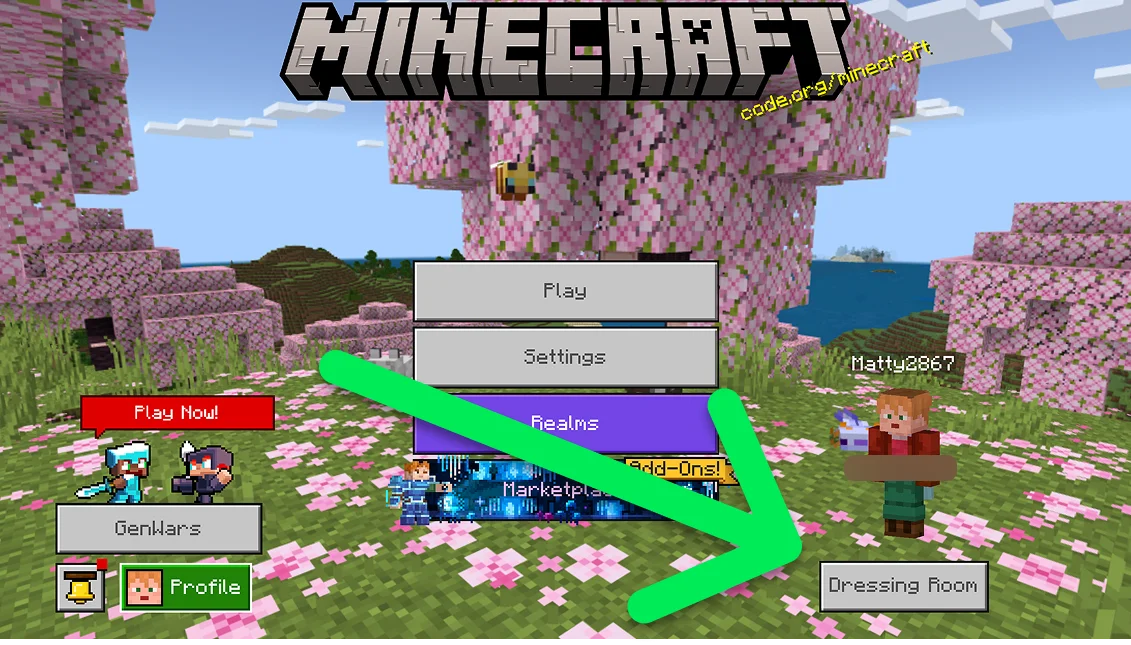
The Dressing Room is where you manage the appearance of your Minecraft character.
3. Select Your Character and Open Classic Skins
Choose the character slot you want to change and select Edit Character. Then select the Classic Skins section from the menu on the left.
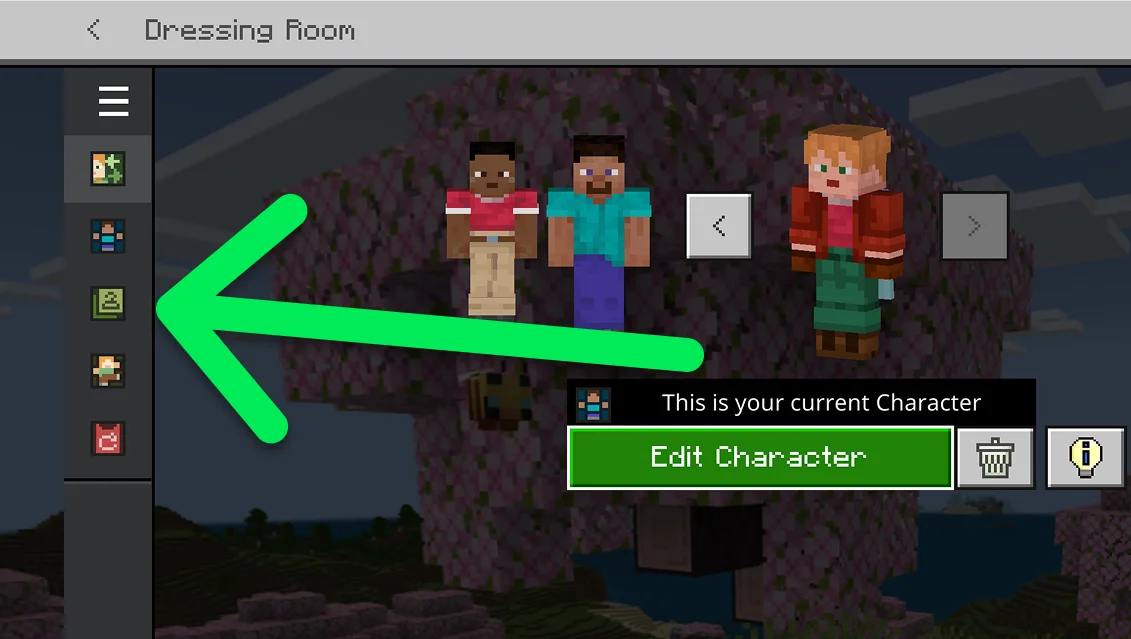
Classic Skins is the section used for traditional Minecraft skin textures rather than individual Character Creator clothing and body items.
4. Open Your Owned Skins
In the Classic Skins section, find Owned Skins. Select the blank character or custom skin slot shown in this area.
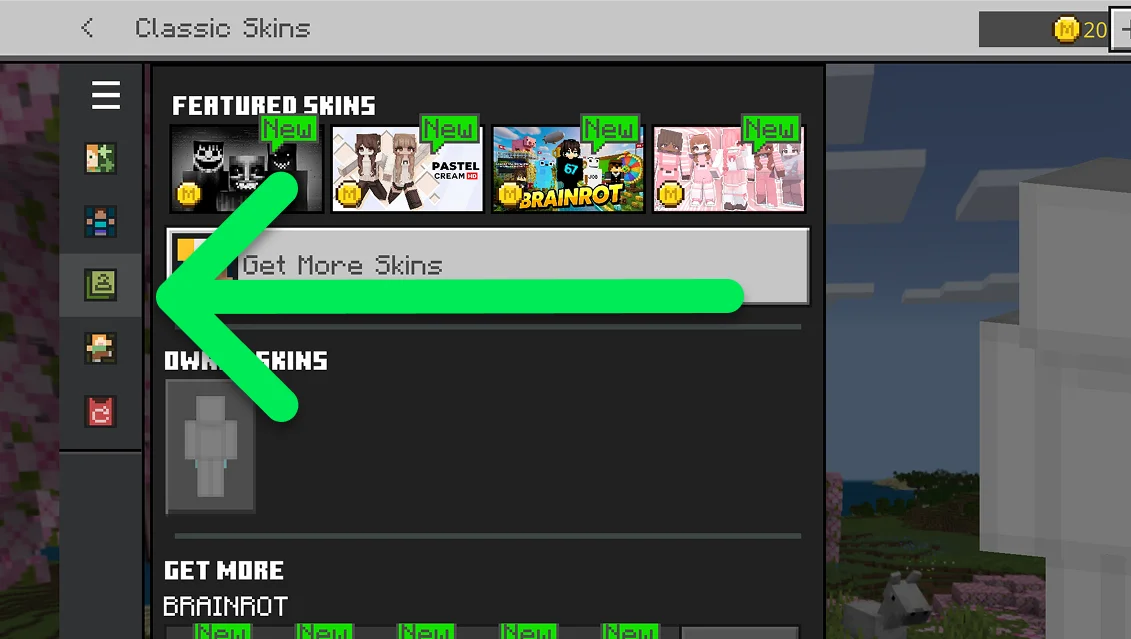
5. Select Choose New Skin
After selecting the custom skin slot, click Choose New Skin. Minecraft will open your device's available files or images.
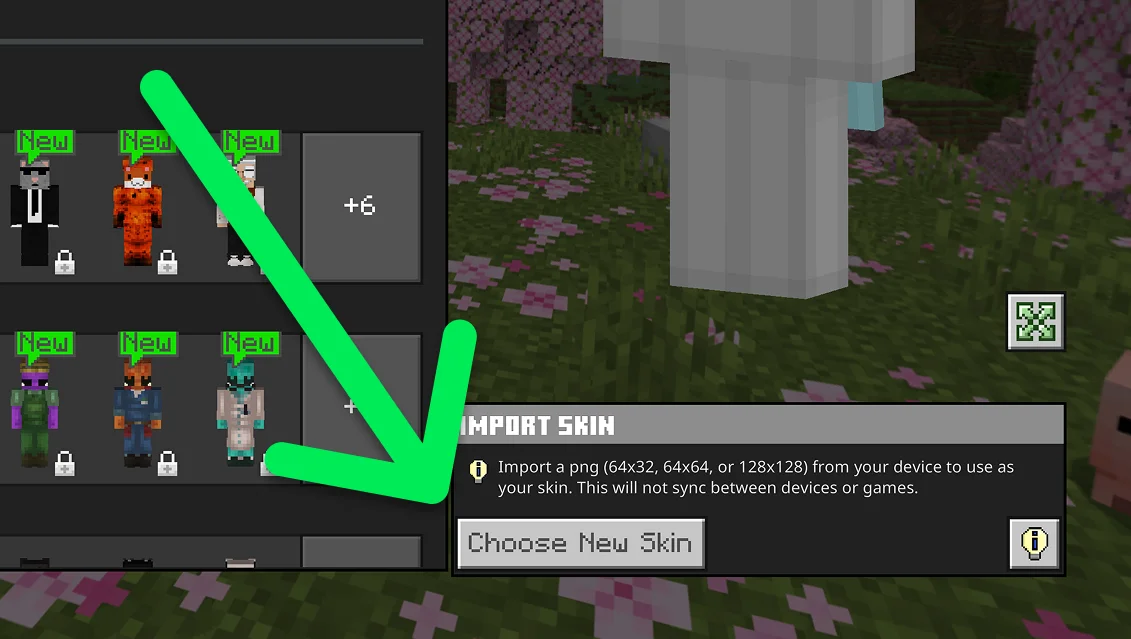
6. Choose the Minecraft Skin PNG
Find the skin PNG you saved earlier and select it. Make sure you choose the actual Minecraft skin texture and not a screenshot, preview image, or unrelated PNG.
7. Choose the Correct Character Model
If Minecraft asks you to choose between character models, select the one your skin was created for.
- Classic/Wide: uses the standard wider Minecraft arms.
- Slim: uses narrower character arms.
If you select the wrong model, the skin may still load, but parts of the arm texture can appear incorrectly aligned.
8. Check Your New Skin in Minecraft
Look at the character preview after importing the skin. Check the front, back, head, arms, and legs. If everything is aligned correctly, return to the game and your new custom Minecraft skin is ready to use.
Quick Steps: How to Put a Custom Skin on Minecraft Bedrock
- Save your Minecraft skin as a PNG.
- Open Minecraft Bedrock Edition.
- Select Dressing Room.
- Choose your character and select Edit Character.
- Open Classic Skins.
- Find Owned Skins.
- Select the custom skin slot.
- Click Choose New Skin.
- Select your skin PNG.
- Choose the correct Classic/Wide or Slim model.
How to Change Your Minecraft Skin Later
You can change your Minecraft skin again whenever you want. Return to the Dressing Room and open Classic Skins to select another available skin or import a different custom PNG.
It is a good idea to keep the original skin files on your device. This makes it easier to reuse, edit, or replace a skin without creating it again.
How to Import a Custom Skin in Minecraft Java Edition
Minecraft Java Edition uses a different skin management system. You can upload a custom skin through the Minecraft Launcher.
- Open the Minecraft Launcher.
- Select Minecraft: Java Edition.
- Open the Skins tab.
- Select New Skin.
- Enter a name for the skin.
- Choose the Wide or Slim model.
- Select Browse and choose your skin file.
- Select Save & Use.
The skin is then added to your skin library, making it easier to switch back to it later.
Minecraft Bedrock vs Java: Custom Skin Import
| Feature | Bedrock Edition | Java Edition |
|---|---|---|
| Custom skin interface | Dressing Room | Minecraft Launcher |
| Skin section | Classic Skins | Skins tab |
| Custom PNG skin | Supported on compatible platforms | Supported |
| Wide/Classic model | Yes | Yes |
| Slim model | Yes | Yes |
Why Is My Custom Minecraft Skin Not Working?
If Minecraft will not import your skin or the character looks wrong afterward, check these common problems first.
| Problem | Possible cause | What to do |
|---|---|---|
| Minecraft will not import the skin | Wrong image or unsupported file | Use the original Minecraft-compatible PNG texture. |
| Skin looks broken | Incorrect texture layout | Export the skin from a proper Minecraft skin editor or generator. |
| Arms look incorrect | Wrong character model | Switch between Classic/Wide and Slim. |
| Imported image looks nothing like the preview | You selected a screenshot instead of the skin texture | Import the original skin PNG. |
| Old skin still appears | The new skin may not be selected yet | Return to your character settings and confirm the imported skin is active. |
Can You Import Any PNG as a Minecraft Skin?
No. A PNG file is not automatically a Minecraft skin. The image must follow Minecraft's character texture layout so the correct pixels are placed on the head, torso, arms, legs, and additional texture layers.
This is why downloading the actual skin file is important. A screenshot of a Minecraft character may look correct as an image, but Minecraft cannot use that screenshot as a character texture.
Can You Turn a Photo Into a Minecraft Skin?
Yes, but the photo must first be converted into a Minecraft-compatible skin texture. You cannot normally select a selfie or ordinary photograph in Minecraft and use it directly as a skin.
An image to Minecraft skin tool can recreate the appearance of a photo using the Minecraft skin layout. You can then preview the result, edit individual details if necessary, download the PNG, and import it using the steps above. For a full walkthrough, see how to turn a photo into a Minecraft skin.
Can You Edit a Minecraft Skin Before Importing It?
Yes. Editing a skin before importing it lets you change individual pixels, clothing, colors, hair, facial details, accessories, and outer layers.
A 3D skin preview is especially useful because a flat Minecraft texture can be difficult to understand at first. Rotate the character and check every side before downloading the final PNG. Use our Minecraft skin editor to edit and preview a skin before importing it.
Tips for Importing a Better Minecraft Skin
- Download the original texture: do not use a screenshot of the skin preview.
- Check the skin in 3D: inspect the front, back, sides, arms, and legs before downloading it.
- Choose the right model: use Classic/Wide or Slim according to the skin design.
- Check the outer layer: details such as hair, clothing, hats, and accessories may use the second texture layer.
- Keep the PNG file: save the original so you can edit or import it again later.
- Use a proper skin editor: manually resizing a normal picture to 64×64 pixels does not turn it into a Minecraft skin.
How to Change or Import a Minecraft Skin: Summary
To import a custom Minecraft skin in Bedrock Edition, save the skin PNG and go to Dressing Room → Edit Character → Classic Skins → Owned Skins → Choose New Skin. Select your PNG, choose the correct character model, and check the preview.
For Java Edition, open Minecraft Launcher → Minecraft: Java Edition → Skins → New Skin, upload the PNG, choose Wide or Slim, and save the skin.
If a custom skin does not work, confirm that you are importing the actual Minecraft skin texture rather than a screenshot or ordinary image. Also check that the texture uses the correct Minecraft layout and character model. Don't have a skin yet? Turn a photo into a Minecraft skin or generate one from text, then import it with the steps above.
Frequently Asked Questions About Minecraft Custom Skins
How do I import a custom skin into Minecraft?
In Minecraft Bedrock Edition, open Dressing Room, select your character, choose Edit Character, open Classic Skins, find your owned skins, and select Choose New Skin. Choose the Minecraft skin PNG from your device and select the correct character model when prompted.
How do I change my Minecraft skin?
In Bedrock Edition, change your skin through the Dressing Room and Classic Skins menu. In Java Edition, open the Minecraft Launcher, select Java Edition, and use the Skins tab.
What file type does a Minecraft skin use?
Custom Minecraft skins use PNG image files arranged according to the Minecraft player skin texture layout. Modern Minecraft skins commonly use a 64×64-pixel texture.
Can I upload any 64×64 PNG to Minecraft?
No. The image must use Minecraft's skin layout. Simply resizing a normal photo or picture to 64×64 pixels does not make it a valid Minecraft skin.
Why does my Minecraft skin look wrong after importing it?
The skin may use the wrong texture layout, or the wrong player model may be selected. Check whether your skin was designed for the Classic/Wide or Slim model and make sure you imported the original skin texture.
What is the difference between Classic and Slim Minecraft skins?
The main difference is the width of the character's arms. The Classic or Wide model has wider arms, while the Slim model has narrower arms. Using the wrong model can make the arm textures appear incorrectly aligned.
Can I make my own Minecraft skin and import it?
Yes. Create or edit the skin using a Minecraft skin editor, download the completed texture as a PNG, and import it into Bedrock or Java Edition using the appropriate skin settings.
Can I use a photo as my Minecraft skin?
Not directly. A photo first needs to be converted or recreated using the Minecraft skin texture layout. Once the result is exported as a compatible skin PNG with a tool like Photo to Skin, you can import it into Minecraft.